Good veggie broth can be expensive. And then there is the packaging and distance it has traveled to consider. There is an easy alternative - make your own! It's simple to do, and incorporating this into your kitchen life style doesn't take a whole lot of effort. Here's what I do to keep us stocked in veggie broth all year...
Every time I make anything with stock veggie I (read: patient hubby) picks up all the scraps and puts them into a large bag we keep in the freezer. When the bag is full (or when 2 bags are full if I have other more pressing things to do), I dump the veggies into my second largest kettle (12 quarts) and fill it to the tippy top with water. This cooks on the stove until I remember it's there a couple hours later. If I'm feeling patient and thorough, I will mash up the veggies some and let it simmer for a little while longer. If I'm too impatient, I skip that step. When it has cooked long enough to look like vegetable broth, I strain it and put it into pint jars.
Now, I have a pressure canner (one of the best home canning purchases I've ever made), so I pressure can mine so I can save precious freezer room. But, if you don't have a pressure canner, you can freeze it in useful sized batches.
These are some of the veggies I regularly save for broth:
carrots
celery
onions
green onion tops
leek greens
tomato pieces
parsley stems
Other veggies that can be good in broth:
peppers (but not too many)
turnips (again, not too many)
garlic
mushrooms stems
You can spice it up with peppercorns and some bay leaves, if you'd like. Usually, the ratio of veggies in my stock bag is pretty much spot on. But, sometimes I have to cut up an extra carrot or celery stock to make it more well rounded.
Making your own stock is a great way to use up some of your food scraps before throwing them into the compost heap. Aside from the energy you use to cook and can, it's a freebie. Which is always good.
Do you make your own stock?

Showing posts with label preserving. Show all posts
Showing posts with label preserving. Show all posts
Monday, March 7, 2011
Monday, November 15, 2010
Our Harvest Storage System for Colder Storage

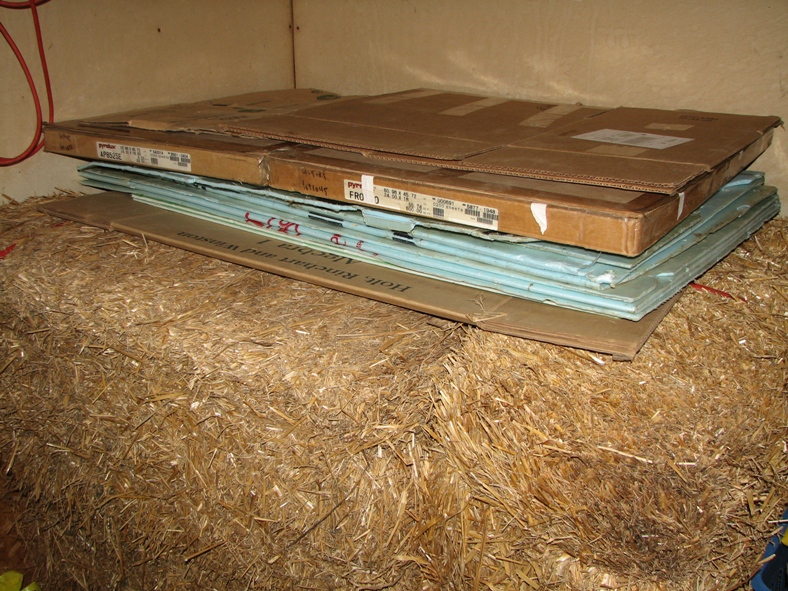
Since we finally got around to storing our potatoes and apples, I thought I would take this opportunity to show you all our cold storage system. We keep our potatoes and apples out in the garage. Our garage is unheated, so we've located our storage bin in a corner that has 2 inside walls. For the other 2 walls of the bin, we stacked a few straw bales for good insulation.
Here's what it looks like:

Inside, we put in a little piece of plywood as a divider to separate our stacks of crates. Not completely necessary, but since we are storing apples with potatoes, we thought every little bit of separation would be helpful. (Since apples give off a gas that helps other veggies to ripen faster - something you definitely do NOT want in a winter storage system...)

As for our bins, we took some old grape crates and fitted them up to make them rodent proof. Well, Nick fitted them up. I just said 'thank you thank you thank you!'

First, he wrapped the whole crate in 1/4" hardware cloth (not really cloth at all, but a metal mesh) and stapled it in place. Then he attached some scrap wood to the top and and front flap of the bin. This allows an air gap between the crates when the are stacked on on top of the other.
To the edges of the piece of wood on the front flap, he added some hooks that will clip into eyes that he screwed into the front of the crate.


It looks like this from the back:


And, behold!! A rodent proof storage bin that will hold about 1/2 bushel.

Stacked.

And put into the garage bin.

Apples in the back, potatoes and garden seeds in the front.

And topped off with some found insulated cardboard, foam board, and cardboard pieces.

Wednesday, October 27, 2010
Volunteers
As you may know, our garden sits on my husband's family property about 5 miles away from where we live. Out there, we have several compost bins for our garden scraps, for the food scraps of those that live there and for those from a local vegan take out restaurant. This year we had a volunteer squash plant growing out of one of those bins.

A monster squash plant, to be precise.

And that one plant yielded this:


I could not grow a lovelier plant if I tried (because believe me! I've tried!).

Plenty enough to go around!!!
We took a few, gave a few to my sister in law, and our friends at the restaurant. We will store ours along with those we purchased from our local organic farm. Butternuts are probably the easiest veggie to store. Seriously, you need no special anything. Just a cooler room in your home.
To cure the squashes, leave them in the sun or in a sunny window for about a week or 2. This allows the skin to harden to a nice protective layer. After they have cured, put them in a room (or closet) that stays somewhere around 50 - 60 degrees, and they will be very happy until spring.
Just as a note, if you are storing less than perfect squashes, the storage life may not be quiet so long.
Very very rewarding!
Monday, October 18, 2010
Our Harvest Storage System for Warmer Storage
Storing our produce for the winter has been a longtime passion for us. Originally, I just made and canned salsa and applesauce. Oh how far from that we have ventured!!! Now we can salsa, tomato sauce and puree, applesauce, pickled veggies, roasted red peppers... the list goes on and on. We also bought a huge freezer and freeze sliced peppers, apples, corn, tons of berries, shredded zucchini, broccoli, cauliflower, beans... this list goes on as well. And, we do a bit of root cellaring as well.
We don't have a root cellar. You don't really need to have one to be successful at cold storage. You can use any unheated space - a closet, back room, attic... - to store veggies. My favorite source for knowledge is Root Cellaring - Natural Cold Storage of Fruits & Veggies by Mike and Nancy Bubel. The book is a clearly written, very informative, and practical guide for storing veggies. Whether you want to store only potatoes, or a whole slew of veggies, this is the book for you. It contains information on planting, harvesting, curing, and a bunch of different ideas on how and where to store you veggies. I find myself turning to this book over and over again.
Different veggies store best in different conditions. Many veggies prefer very cold temps for storage - potatoes, apples, carrots, beets,... Some do best in just cool temps - garlic, onions,... But some do well in moderately warm temps like squashes and green tomatoes. There is some overlap and flexibility, so storage systems do not have to be elaborate to keep your veggies for a long period of time. Of course, the more accurate you can be with your temperatures and humidity, the better and longer your veggies will keep. But if your conditions are not exactly right, don't let that stop you! Your produce will keep for a while anyhow. One year, we had so many green tomatoes that we were able to enjoy them for Thanksgiving dinner!! (A rarity here in northeaster Ohio.)
Our storage system contains two parts. One is stored in our back room that typically falls around 60 degrees in the winter months. This is the one I will show you today. The other is in our garage and made of straw bales. When I get around to packing up our potatoes, I will show you that one.
Here it is:

It is made from grape crates that we collected from some relatives who make lots and lots of wine. My brother in law cut the one side in order to make a stackable, but functional bin.


Once they were all cut and cleaned, I stacked them on a utility shelf. I wanted a little extra room to access them from the front, so I staggered them a bit like so:

Yikes!!! The cobwebs!!!! I didn't even realize those were there until I took the picture! Please just ignore them. I can't really imagine life without cobwebs. Maybe some day... The top bins in each stack were left as they came so that I could put things in there that might require better containment. I find them useful for storing other things that we buy in cases, like dog treats or cracker boxes or peanut butter buckets.
Each year, I empty out what is left over from the previous year, vacuum out the bins, and line them with fresh newspaper.

Then!!! What we all have been waiting for... the produce!!!

Our bins are currently holding garlic, red and purple onions, and the last of last years butternuts. While I was away this weekend, (to the crazy but fun Universal parks to visit the new Harry Potter world with my sisters. It's a sister's thing with us. I'll probably make a post about that when I get all the pics from my sisters.) Nick filled up 2 of the other bins with our green tomatoes.
Since this room is a back room with 2 outside walls, 1 inside wall, and 1 unheated garage wall, the temps range in the mid 50's to 60 range most of the winter. I have found squashes, particularly butternuts, keep well until spring, but will last until the following year (see above). They are not exactly pretty, and have dried up a bit by now. But they are still perfectly edible. Kinda nice when you have a spectacular year one year, and then a not so spectacular year the next. Onions and garlic prefer a bit cooler temps, but they store well through the winter here nevertheless. Sweet potatoes will like this storage system as well, if I ever get around to growing any of those. Dreaming is free.
As with anything, there is so much information out there that it can be somewhat overwhelming. The trick is really just to do the best you can with what you've got. Find a place in your home where you can store something - even if it's just a couple of butternuts on the top shelf of an unheated closet. It truly is the easiest way to store your goods over winter. There is no processing involved so the food remains whole. You don't need any complicated or expensive equipment. But you get an awful lot of satisfaction out of it.
Friday, September 3, 2010
Making Tomato Puree

Each year, we can lots and lots of tomato products - salsa, sauce, veggie sauce (tomato sauce with lots and lots of other veggies), and puree (juice really) being the biggest hitters. I love to make each one of those... except the puree. We have and still use the old Victorio Strainer that my husband and his family used growing up. Being spatially impaired, I can never quite get it together in the proper fashion. So, we make this process a family affair.

Everyone gets in on the action. And everyone has a job to do. Mine is to gather up the tomatoes, wash them, take of the nasty parts, and cut them into manageable pieces. Nick's job is to set everything up, manage the kids, oversee the Using Of The Machine, tear down, dump juice from the pan to the large kettle, and anything else that I don't feel like doing!!! (Thank you so much, Nick.) He really is the driving force at making puree. I love love love to use it - in tomato soup, making tomato eggs (eggs poached in the juice - so wonderful!), in soups and stews, etc. But, I have such an aversion to actually making it.
As I was saying... Everyone has their jobs. Munch handles getting the puree off of the strainer and into the pan.

Boy turns the crank. Afterall, he really is the strongest one of us. ;o)
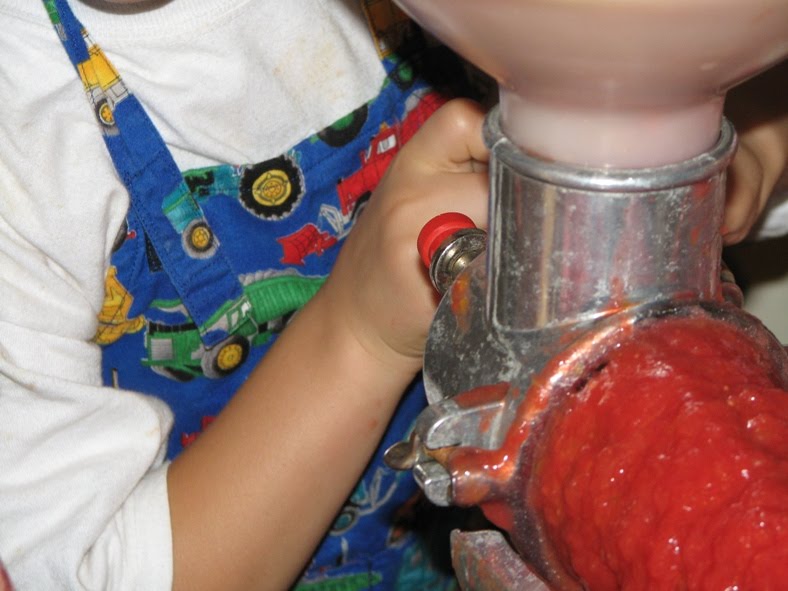
Sweetpea adds tomatoes to the top, and generally tries to take over everyone's jobs.

We all really have a great time. Up to a certain point, that is. So, we try not to make a bigger batch than we have energy for. But, The Machine only comes out once per year. So, finding a balance is important.


After all the juice is collected into our largest, 24 quart kettle that I stole from my mother, I cook it down a bit.

And can it in my pressure canner.

Ready for lots of tomato soup!!! Mmmmm....
What are your favorite ways to can tomatoes?
Tuesday, August 17, 2010
Summer's Simple Things - A Little Help
When one has a task to do.

No matter how great or how small, it's always so nice to have a helper!!

No matter how great or how small.

The job gets done in half the time! Ahem... Well... The job gets done in a fraction of the time! Uhhh... Well, the helper definitely brings more joy to the task!

Ready for steaming and freezing. Now, if only someone would offer to help me clean up all those other messes!!
Wednesday, August 11, 2010
A bit of Randomness

This was my inspiration for this...

My new bench has settled nicely into our garden. Notice all the weeds that have already grown up around it. Behind it, in that big pot, is Boy's carrot patch. He sits on this little bench facing backwards and watches his carrots grow.
We have been growing our best ever peppers this year. Here's one of the pepper beds. You can see the other on the right. I like to intersperse flowers in with nearly everything I plant. They will attract beneficial insects to your plants, help keep away pesty bugs, and they look pretty.


Surprise!!! A fall pea plant appearing out of nowhere in amongst the fall greens!!! How fun and unexpected. (Who says gardens can't be exciting?)

Summer lettuce. It's nice to still have lettuce in August. Crispy kinds, like romaines, work best. This one is Michelle Lettuce.

Magic beans. So pretty even when they're not all the way open.

Bits of pure sunshine in your mouth.

Taking care of the harvest.


Of course, it's always best to just leave on jar open. You can't leave jars of jam on the counter that long without someone wanting to taste it!

Hope your day is filled with summery goodness!
Subscribe to:
Posts (Atom)